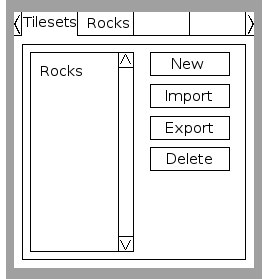
Okay well actually just one mockup, the tilesets tab/pane. I haven’t gotten much done, but I did make this, which is how work will proceed. I’m thinking of just starting on the gui elements to make this mockup possible, before attempting to design anymore of the map editor. What do you think?
Keith
Edit December 11th, 2008:
I’m looking at this screen and seeing a few elements here I need to work out. Buttons. Vertical scroll bar. tabs (which could actually be buttons if designed in a way). A list box. The actual dialog or sheet the tab is opened to. I’ll probably start with buttons. Since I’m doing this in xna, I will probably use xna to draw colored rects, with text in them.
Okay this is actually the element list, and the final dump from the file. It’s not nearly complete, it’s probably not in it’s final form, but it’s an attempt at trying to define each of the individual elements I’m going to have to code. Also right now I’m going to focus on the tile pane, so the other parts are left blank on purpose.
Here’s the text:
Created November 20th 2008:
Map editor elements
——————-
Tileset pane
———
Tileset tab - will have tabbed windows for tileset creation and each tileset:
create tileset button
import tileset button
export tileset button
delete tileset button
under tileset buttons:
list of created tilesets
current tileset tab:
current tile box - display image of current tile and buttons:
image of tile, attempt to fit.
beside current tile image:
add tiles button
remove tile button
import tile button - like add new tile but replaces current tile index
zoom in button
zoom out button
list box - under current tile box:
a smaller thumbnail beside a name of the tile.
create tile / import tile window:
file button
done button
width edit box
height edit box
use whole image button
grab all tiles button
listbox at top right for tile/image names
current image box left bottom,
current tile box on right bottom
——————-
layer pane
——————-
Editor itself
————-
file drop down menu
new map option
save as option
save option
open map option
exit option
——————-
Okay this is the tricky tile selection window I designed today. This was a pain I had to keep rethinking what I wanted or needed it to do. A friend is helping me learn about design, so my requirements were to remove tedium from the user and programming complexity for myself. I guess I’ll let the text speak for itself.
Here’s the text:
November 20th 2008:
Tileset pane now will have tabs, with a scrollbar at the bottom for when there are too many tabs for the tileset pane. The first tab is always the tileset creation tab, with new, import, export, etc. Then under that it will have the list of tilesets.
The new tile creation window will allow you to create multiple tiles before going back into the map editor. There will be a file dialog to open image files, and when you select an image it will appear on the left half of the window. There will be scroll bars to let you scroll around a larger image than the source image window. There will also be a preview window smaller on the right. In the preview window are two edit boxes for width and height, which are situated at the top, and two buttons on the bottom, one says use whole image, and the other says grab all tiles. The tiles that are selected are going to be highlighted, and you may click to add or delete it. pre-defined tile names will appear in a list box at the top right, as well as what image they’re connected to. A selector box will appear around the mouse depending on what tile it’s in, and when you switch tiles int he list box, it will also change position of the selector box. The width and height will determine tile sizes, and you may load in more than one image. While the width and height of each tile in the same image must be the same size, the tiles in a different image may have a different size. Also the width and height will be arbitrary as decided by the user. For instance, the user may have rocks at a 32×24 template, where all rocks in this image must be this same size… however a tree image may contains 64×48, and it will add in the tiles from each of these images at their respective sizes. When the user hits the done button all tiles in the set should be available starting from the second tab, in the tileset panel, ready for use.
End of Text.
As you can see I figured it out. The only restriction is that each tile in a single image be the same size as it’s neighbor. They don’t have to be power’s of two or the same width as height. Simply if you have, say, a bunch of rocks in a sprite sheet (fancy term for multiple graphic elements in the same image file), each rock element has to be the same size as it’s neighbors, for instance, say you chose a funky 15×7, all the rocks in that one sprite sheet has to be 15×7. But you can have multiple elements (tiles) in a single tile set, and use multiple images, so that shouldn’t be much of a restriction. I like to call it “size batching” cuz like everything is batching nowadays ;-)
Okay the next day I wrote about the tile pane. Here you’ll be able to select tiles, and create new tile sets. Oh by the way a tile is essentially any image or section of an image… let’s just say map element. I call it tile because of the old way of tile based games. In fact one of the goals is to be able to emulate tile based map editing, so you can still work that way if you wish. I actually wrote this yesterday, even though I’m posting this on the 20th. I’m dating each piece to see the changes.
Here’s the text:
November 19th, 2008:
The tile pane will consist of a list box of tiles which are image elements or other tile chunks. beside each list element there will be a small thumbnail, and the currently selected item will have it displayed above the list. It will have these options, Import Tileset, Export Tileset, beside the actual selected tile will be a new tile button, an import (over current tile) button, and a delete tile button. If a tile is not selected then and import or delete is selected it should return a message that you need to select a tile, however, it will be coded in such a way as there is always something selected. If you hit import or delete, a dialog box will popup and ask if you’re sure. There will be zoom in and out buttons, so that you can zoom in to the tile currently selected. If new is hit at any time, the create new tile window will come up. It will ask for a filename (probably use a file selector box), to load the image from, then will allow you to select what part of the image to use. Three buttons in the image selection is, whole image, this will simply import the whole image as the tile. By tile size, will load in all tiles from an image based on tile size and image size, which will create seperate tiles for each. This is so you can still do standard tile based maps if you want. default will be based on display size (window/screen)… It will act like normal tile based access and you need simply click on the tile you wish to import. Drag+Select will allow you to “freehand” drag a rectangle over the part of the image you wish to import. Once you’ve hit ok, the tile will be in the tile list. Import will replace a tile set with another. If there’s not enough tiles in the tileset for the map, those tiles will be removed from the map. Export will save a tileset seperately. This is different than saving a map which includes tileset info. You should be able to create a new tileset within the current map. So you could have seperate tilesets if you wish.
End of Text.
I’ve drastically “retooled” the tile creation window. Simplified it in places and made it possibly easier for the user. I won’t really go into detail here, but this was the idea of the tile pane along with the tile selection window. In the near future I plan to put up some mockups.
I’m going to dump what I have so far in multiple posts, so it doesn’t get too long. I started a few days ago, and I backdated some paragraphs, to give an idea of when I did them, and also to document that fact.
This first part concerns the design of the map editor in general. These are just the ideas in my head that I wanted to include, they probably will end up changing before the final specs are made. In any case, I’m putting this up for posterity, because I doubt I have any readers.
Text is as follows:
Map editor - November 18th 2008, Keith Weatherby II
Will have traditional style gui, but written to be able to run on the xbox 360 and pc. There will be two areas on the screen, on the right side will be the map chunk pane. Map chunks can be as small as a single graphic element or tile, to many tiles arranged as
pieces of a map. In fact a map will be a chunk itself. The left side will be the map area. Each pane will be able to scroll individually. It will allow multiple layers for a parallax effect. The chunk pane may have more than one page, probably setup like tabs. Later I would like to build an integrated collision map editor, and a character editor, and add the ability to add characters and objects to the map. The elements should be able to scale with the resolution. Minimum resolution should be 800×600. Font should scale with resolution as well. There probably won’t be a max resolution. The right pane should also contain a layer window, to be able to turn off layer visibility, and adjust transparency. Transparency will also be related to visibility rather than an actual feature of the map. You should be working on the active layer, sort of like Gimp does it’s layers. Map chunks shouldn’t be able to include each other, they will each have a unique id, and when loading or saving will have to resolve/not allow cyclical dependencies. To edit a map chunk, you must first load up the indivudal graphics or tile chunks into the element window. Then you must be able to click-drag-drop from the element window onto the map. A grid can be displayed, and images can “snap” to grid lines, for a more traditional way of editing (simulated tile editing). You should be able to view/scroll the map around, as well as getting an overview version (a scaled down version of the entire map).
End of Text.
I’m deciding now whether I’m going to use chunks though, instead I may just create a rubber stamp tool, or otherwise just copy and paste by selecting a bunch of tiles and putting it where you want. This means an increase in data slightly, but I won’t have any circular reference issues. In any case this is sort of a “living” document.
Okay so like two people I think tried my program, which is ok, not many people could actually play it anyways because it runs on XNA and C#. But I did learn a few things. Ultimately I found out that making my game is going to be a lot more pain that I had hoped. So to make life bearable, I decided I wanted to create some tools first. First being a map editor. It seems map editors are rites of passage for game programmers, and I’ve been putting mine off long enough.
So the goal is three-fold, A) is to make a tool for Hypno-Joe, B) is a tool that will run on windows and the xbox 360 via xna/c#, and C) the ability to include a level editor into my future games.
I have several features planned.
Full featured map editor, utilizing layers, arbitrary positioning with grid snap, maps made out of chunks of “tiles” put together, arbitrarily shaped “tiles”
Eventually I will have a collision map creation tool, character creation tool, object placement, animated tiles, etc… In other words a full on level editor, but right now of course I just want to create the map editor.
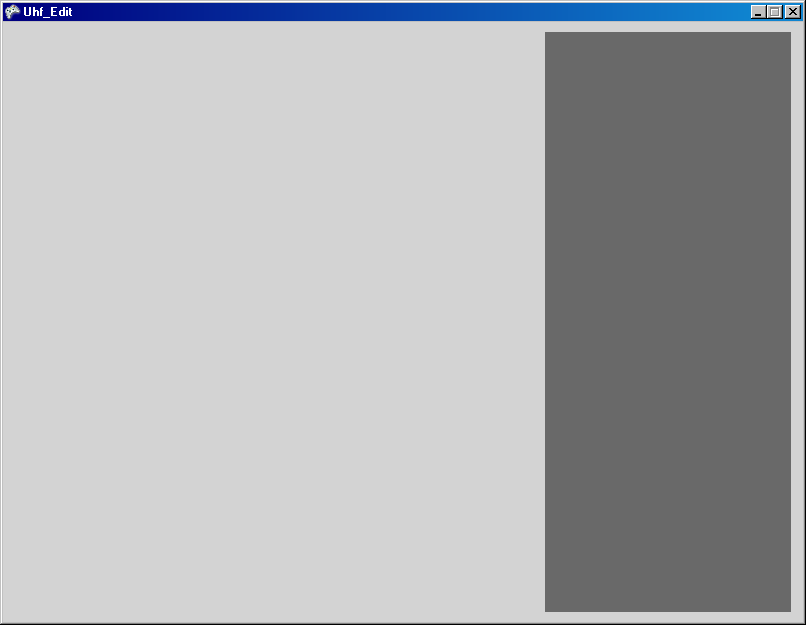
I even created a new project and had it draw something on the screen. Here’s a screenshot of “Uhf-Edit”:
Great huh? By the way that’s not a dark gray rectangle, it’s a black transparent rectangle. I wanted to do something different than xna’s default cornflower blue. So I decided that light gray suited it better. In any case, this many not be even the start of anything, it was merely to get me to do some coding the other day.
Originally I was going to use a book called Building XNA 2.0 Games by James Silva and John Sedlak, but the more I used it, the more I realized I was going to need to modify it. And even though I was typing in the code, I didn’t really know it well enough like my own code. See the reason people tend to re-invent the wheel, is because most great minds don’t think alike. In other words I know how all my own code works because I recognize the thought processes I used to come to that piece of code. I don’t have the mind of some other programming, so I don’t really know what they were thinking. The book is great, in fact I’m still going to go through it. It’s given me a lot of great ideas about how to approach my own tool.
Since I was starting over I was going to go ahead and build myself some proper tools. Well there ya have it.
I’m actually going to blog about it quite a bit. You could sort of use my posts as a tutorial of sorts. I’m not going to really give you any code, but I’ll show you the process I go through, and who knows maybe you will want to write your own. In the next post I plan on dumping my “notes” (a bunch of ideas typed into notepad). I’m also going to start organizing the tasks into steps so when I get to actual coding, I’ll know exactly what I’m doing. Along the way I’ll show notes and progress and maybe example code. So stay tuned.
Okay so basically I copped out and finished this thing as quickly as possible. I could have added more stuff to make this more game friendly but I got tired of working on it… a couple of weeks of actual work, but more than a month off-and-on. Since this is just a single game mechanic with a simple win and lose condition I didn’t include a menu or instructions or anything. I probably will make a video of it in a week or so assuming anyone plays it. This is written for windows and xna, so you need xna game studio 2.0 to be able deploy and run this thing. I decided I would probably ditch this and go through a book called Building XNA 2.0 Games by James Silva and John Sedlak, since it has some things in it which would be beneficial to this type of game. But for completeness decided to release it.
Note since there’s no instructions here they are :
Goal is to exit the level without being “killed”. You can be killed one of two ways, either by the facepalm (giant floating hand) or the brainless dummy (walking dude). When you’re killed the program simply exits. If you can find a way to make the program exit without getting killed one of these two ways, you have won. You may control the Dummy by hypnotizing him, and then when you’re close to him in the hypnotic state you must hit the “fire” button again. I’m just getting an idea if it’s interesting to people to make a game based around this. You can use both mouse and xbox 360 controller. If the controller is connected mouse and keyboard doesn’t function, otherwise you use mouse and keyboard.
Keyboard controls: A,D to move, W to jump. Use the mouse to rotate Joe’s eyes, and left mouse button to fire the “hypnosis bolts” to hypnotize the enemies.
Xbox 360 controller controls - left trigger to jump, right trigger to fire “hypnosis bolts”. Left thumbstick to move left and right, or dpad, right thumbstick to move Joes eyes. Note you need to push the thumbstick out a bit because there’s a dead spot, but it will stay in the position you left it.
ESC will exit the program when no controller is hooked up, otherwise you must use the controller’s “back” button (left of the xbox guide button).
This is a really junky program to demonstrate the hypnosis mechanic. Anyways, thanks.
Edit: I was told that a ccgame file is sort of a pain because you need the full visual studio and xna game studio 2.0 installation to deploy a cc game. So instead I decided to package it directly into the zip so that if you have the runtimes you can just run it without installing everything else.
Edit: I went ahead and got the info for what you need to run the game.
First you need the Microsoft XNA Framework redistributable found here.
Next you need the .NET 2.0 framework redistributable here.
The .NET 2.0 Framework service pack 1 which is here.
Finally you need Direct-X 9c runtimes. The web installer is right here.
A small note, someone was telling me that if you’re running vista and you have direct-x 10, you may need 9 as well to run this. Also it requires a display of at least 1280×720 (recommend 1280×1024), and windows xp/vista. It’s possible if you have all of the above you could run it on windows 2000.
Well here’s 5 and 6, i wasn’t going to do anymore vids for a while, but I want to bring attention to an issue. Maybe a few of the few that actually read this can give me some ideas.
Hypno-Joe requires very specific things for sprites and collisions. They have to be at the right position at the right times to match the animations. Mostly I’ve been just hacking these interactions together, but it’s far from foolproof. For instance in the video the “Brainless dummy” (You can tell them by their neanderthal like brow and almost teardrop shaped head) will ‘pound’ Joe with his fist. To do this he must be facing Joe, and then play the animation, then when the animation is done, I “crumple” Joe up. But at times the fist doesn’t connect with the brain.
If I just stand there like here in vid 5:
Then it’s pretty much at the perfect position.
However Joe slides sometimes and he looks like vid 6:
You may not be able to see it clearly, but he was in a different position, and thus there wasn’t a good connection with fist to brain.
I’m trying to figure out the best ways to deal with this, as I have something coming up where you “ride” a Dummy while he’s hypnotized. In order for that to work I’ve got to do a number of things, first, both characters have to be in a specific position, second, I can do it a number of ways including, just creating a “climbing” animation which includes both characters. This would mean the animation plays, and then play resumes.
In this instance, I would create a larger sprite for Joe that includes the dummy lifting him up and walking. There are some potential problems to this, one being that the sprite could be resized but the collision rect still only encompasses Joe (specifically legs feet and brain, as the eyes aren’t included in collision as seperate entities). I could also increase the dimensions of Joe for a period of time to include the dummy sprite with it. Which would help with collision. I don’t know what affect it would have changing dimensions in real time though.
Another way to do it is to actually use the dummy and Joe characters. I would have to create a “sitting” animation for Joe, and then move him into place attached to the Dummy somehow, and temporarily “control” the Dummy instead. This has an added bonus of when you get off of him, I can program him to return to his place on his platform. Also you’ll have to get off eventually when you see his eyes start to change from a hypnotic state to a regular state.
It’s just a pain all these little details (for instance getting the eyes in the right position on left and right sides, and changing angles — Also making sure the “hypnosis bolts” hit the eye area of the baddie. I had to create a seperate entity just for the eyes). I think it will be worth it when the actual full, real, game is done, but until then, it’s problematic.
If anyone has any ideas of how to better accommodate specific positions, and interactions let me know, as I’m trying to figure out how to make it easier to program.
I think this is the last of the vids for a while. Will need to get some decent feedback, so I guess you won’t be able to see the finished product for a little while, unless you installed xna game studio 2.0 (and subsequently visual studio 2005, or express). After I’ve gotten requisite feedback (maybe a few weeks, or who knows), then i’ll create another vid showing it.
Welp, I added the hypnosis code. Doesn’t do much. Stops the “Brainless Dummy” then plays a silly animation, that I knocked up in about 30 minutes… The only bad part is even though it’s not very good, you can’t even see it do it’s thing very well. You tube really makes the quality suffer. Ahh well, so is life. I guess I could always do some other video sharing site.
I only did this whole “feature” in about an hour though. Wherein two weeks since dream build play I didn’t even get a darn thing done. Just messed around with trying to improve my framework.